Almost every project I am involved in demands a cloud component design element. Typically this will be with either the MS Azure of AWS public clouds however it is not uncommon for Google Cloud, Alibaba or Oracle cloud offerings requiring consideration. In order to stay current with these technologies it is necessary to practice or “LAB” these skills, and what better way to make a start than to connect your existing lab and a Azure subscription?
In this post I will will:
- Configure the necessary Azure networking components.
- Deploy an Azure VPN Gateway
- Deploy an Azure virtual machine
- Configure a Server 2016 Routing & remote Access Server (RRAS) server in my home Lab
- Demonstrate connectivity between the two environments.
Overview
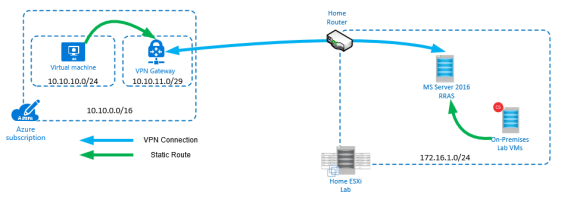
A new Azure virtual network will be created with two subnets; the first (default) to be used by the Azure virtual machines & the second to be used by the “Gateway Subnet”. A Virtual machine will be created in the default subnet.
A Server 2016 RRAS server will be installed in my home lab & configured to connect to the public IP of the Azure VPN Gateway. To ensure both Home Lab & Azure can communicate; static routes will be introduced to ensure traffic is routed correctly.
Prerequisites
- Created an Azure subscription
- Have a home lab with domain configured
- Have a new Server 2016 virtual machine deployed.
- Configure 2 vNICs on the virtual machine
- Internal
- This should have a static address in your home lab address range. i.e. 172.16.1.56/24
- No default gateway
- External
- This should have a static address in your home address range. i.e. 172.16.1.57/24
- The default gateway should be set to your standard gateway (i.e. 172.16.1.1)
- Internal
- Configure 2 vNICs on the virtual machine
- You home router should be configured to allow VPN pass through.
- Configure Ports UDP 500 & UDP4500 to forward through to your RRAS VM.
Process
Configure Azure Networking
- From the Azure portal create a Resource group in which to place the Azure components.
- Create a new Virtual Network, use the following fields as a guide:
- Name: CVLab
- Address Space: 10.10.0.0/16
- Subscription: Your Subscription/Free Trial
- Resource Group: As created earlier.
- Location: As Desired
- Subnet
- Name: default
- Address Range: 10.10.10.0/24
- DDoS Protection: Standard
- Service Endpoints: Disabled
- Firewall: Disabled
- Once the virtual network has deployed, create a Gateway subnet:

Ensure the Gateway subnet is configured accordingly:- Address Range: 10.10.11.0/29
- Route Table – None
- Services None
- Delegate subnet: None
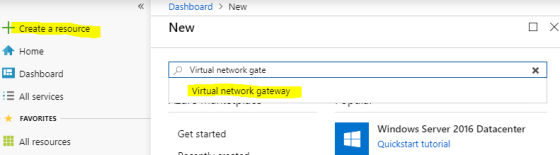
- Add a virtual network gateway. This will be used by your RRAS server as a VPN connection target.
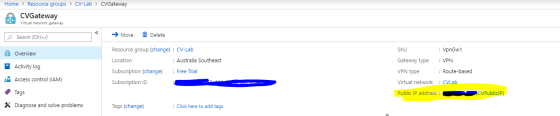
Configure as follows:- Name: CVGateway
- Type: VPN
- VPN Type: Route Based
- Virtual Network: CVLab
- Public IP: Create New
- This is auto-generated and will be the endpoint targeted by your on-premises RRAS server.
- PublicIPName:CVPublicIP
- Subscription: Your Subscription/Free Trial
- Location: Same as where you created your vNet.
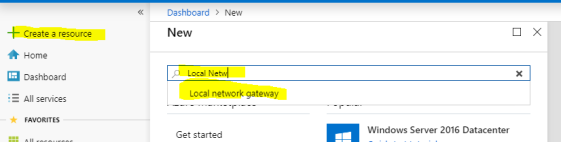
- Create a local Network Gateway. This will be used to allow your Azure VMs to connect to your on-premises VMs
Configure as follows:- Name: CVLabGateway
- IP Address: The IP Address of your home internet connection
- NOTE: if you have a dynamic IP address, this IP will will need to be updated when that IP changes.
- Address space: Your Lab (on-premises) network. For me this is 172.16.1.0/24. You may add multiple address spaces here if appropriate.
- Subscription: Your Subscription/Free Trial
- ResourceGroup: Your Resource Group
- Location: Same as where you created your vNet.
- Once the local gateway has finished deploying (can take a while), you can create a connection object.
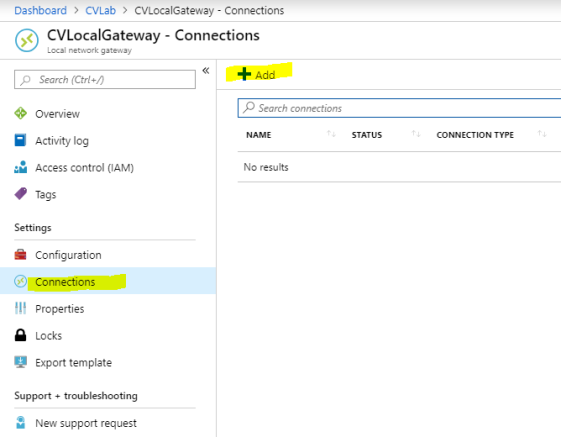 Configure as follows:
- Name: CVLabHomeCon
- Virtual Network Gateway: CVGateway
- PSK: Make one up, the longer and more complicated the better. This will be used by your RRAS Server.
- ResourceGroup : Your Resource Group
Configure RRAS
- Install Routing & Remote Access on your Server 2016 VM
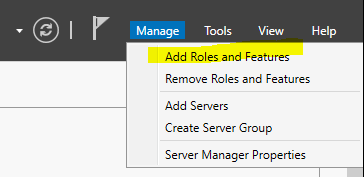
- From server manager, add Roles & Features
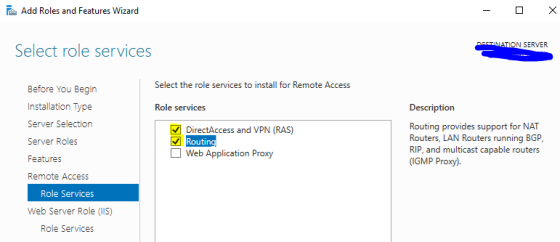
- Click next through until you reach Roles. Select Remote Access and click Next until you reach the Select Role Services page.
- Select Routing and DirectAccess and VPN (RAS). Click Add Features when prompted.
- Click Next until the confirm page, then click Install.
- From server manager, add Roles & Features
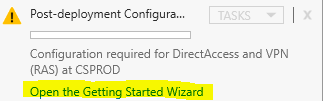
- Once RRAS is installed, click Open the getting started wizard.
- Select Deploy VPN Only
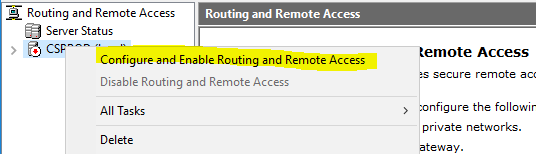
- Right click the name of your sever in the RRAS console and select Configure and Enable Routing and Remote Access.
- On the Configuration page, click Custom configuration.
- Select VPN Access and LAN Routing. Click Next and Finish. If warned about the windows firewall click OK.
- Click Start Service when prompted.
- Create a new demand dial interface as shown below:
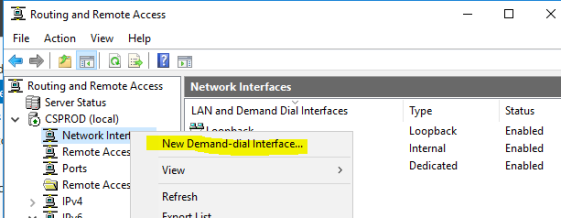
- Name: Azure On-Demand
- Connection Type: VPN
- Type: IKEv2
- Host Name: The public IP of your Azure Virtual Network Gateway:
- Protocols and Security:
- Route IP Packets on this interface
- Static Routes:
- Destination: 10.10.10.0
- Mask: 255.255.255.0
- Metric: 10
- Dial Out Credentials – just write “Nothing” in the Username and click next. We’ll be using the PSK created earlier.
- Once the interface has been created, right click on the Azure On-Demand interface and choose properties.
- Select Security and Use preshared key for authentication. Enter your PSK in the box.
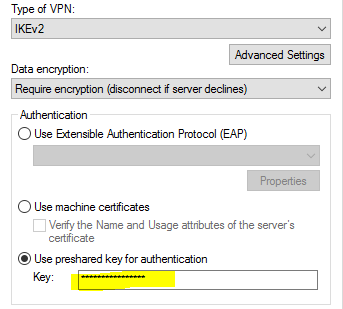
Click OK - Right Click your connection and choose Connect.
Configure Azure VM
- Back in the Azure portal, deploy a new virtual machine. The size is upto you but ensure it has the following properties:
- Region: Same as where you deployed the previous components
- OS: Windows Server
- Public Inbound Ports: None
- Virtual Network: CVLab
- Subnet: default
- The other areas can be left as default or adjusted if necessary.
- Wait for the VM to be deployed then proceed.
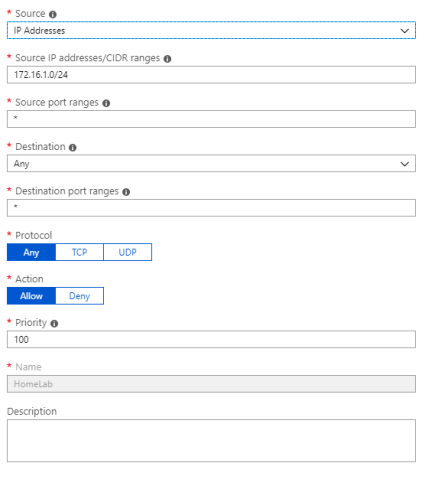
- From the Networking tab on the new VM, create a new rule to allow traffic from your home lab network (i.e. 172.16.1.0/24). This can be for specific ports or a blanket rule between your home & azure environments. Ensure at least RDP (3389) is allowed. In the below example I have allowed all traffic from my local Lab subnet.
Configure Static Routes
In the current state, your RRAS server will be able to connect to your AzureVM as the route to use has been added by the RRAS config. The next step is to add routes to the other VMs (both Azure and local Lab) to allow communication between subnets. The route add commands would be written as follows:
For Local lab VMs
ROUTE ADD 10.10.10.0 mask 255.255.255.0 172.16.1.56 metric 2 -p
For Azure VMs
ROUTE ADD 172.16.1.0 mask 255.255.255.0 172.16.1.57 metric 2 -p
Ping (ICMP) is not allowed through the windows firewall by default, however RDP on the Azure VMs is. From your RRAS server, RDP to the private IP of your new Azure VM, if you get a connection that proves RRAS is working. You will need to add the appropriate static routes to the test VMs before you can repeat the same test outside of the RRAS VM.
Next Steps
If you would like to make this Azure VM (and others) part of your domain for an extended period, it would be advisable to get a few other things tidied up, for example:
- DNS Zones
- Centralising the static Routes
- Via Group Policy
- Via Physical/Virtual network hardware.
- Locking down the Azure ports using network security groups.

Many thanks extremely handy. Will certainly share website with my buddies.|
LikeLiked by 1 person